


Top 5 tips on How To achieve better DIY Eyebrow Shaping at home
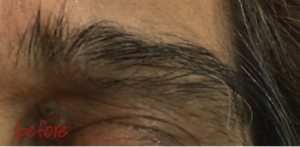
Overgrown Eyebrow
In the current climate of uncertainty and salon lockdown, it’s now perhaps a case of “desperate times calls for desperate measures” and in particular when it comes to maintaining some sort of a beauty routine at home.
The guidelines set out below will hopefully pre-empt and prevent any at home ‘DIY ‘brow shaping disasters.
Something to consider before attempting your DIY brow shape is to know from the start that.. *When it comes to hair removal two fundamental factors are key;
- Great stretch on the skin for the area you are working on and,
- Great technique
With this in mind here are my;
Top 5 tips on – How To achieve better DIY Eyebrow Shaping results at home;
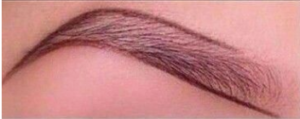
Ideal Eyebrow Shape outline
Tip 1 – Assess the overall eyebrow shape
Look at the shape of your eyebrows and imagine their ideal brow shape outline and draw with a pencil the outline of your eyebrows as indicated in the pic i.e wide body shape and tapered tail end
*A good eyebrow should have a wider body shape from inner nose area to arch point and a tail-end tapering to a point. The overall outline shape of the brow should look like a consistent line top and bottom without any gaps.
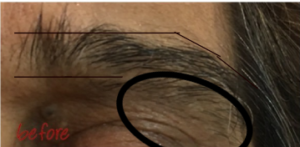
Brow Shape prep outline
Tip 2 – Know what hairs should be removed
The hair growth outside the brow line area (as indicated in the pic) is considered brow hair overgrowth and does not contribute to the overall eyebrow shape. *This is the brow hair that can be removed via threading, waxing or tweezering methods for a better and improved overall eyebrow shape (*See Method procedures below)
Tip 3 – Before attempting to remove hair, Stretch the skin!
Stretching the skin on the area you are working prevents against any unnecessary nicks or bruising of the skin and ensures hair is pulled out from the root.
Tip 4 – Always work against the growth of the hair
Combined with Tip 3 (stretch the skin) this technique ensures effective hair removal from the root, first time!
Tip 5 – Do Not overwork the delicate eye skin area
All hair removal is a form of skin exfoliation by adhering to methods specified in both Tip 3 & Tip 4 will avoid over traumatising the delicate skin area.
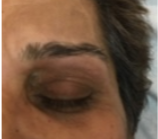
Finished Eyebrow Shape
Finishing Tips
Brush brow hairs up and using a brow scissors trim hairs extending over the top brow line
Always follow any hair removal process with a soothing application of moisturiser preferably containing SPF to protect the area against harmful UV damage
Hair Removal Method via Tweezer
- Hold the tweezer in your dominant hand and use the other hand to stretch the skin.
- Always focus on removing hair growth outside the natural eyebrow brow line area only *(Refer to Tip 1 above)
- Tweezer against the hair growth to effectively tweezer out hairs.
*If done correctly the hair tweezered out should reveal the hair bulb. This means the hair has successfully been plucked from the root.
*If done incorrectly the hair will snap and break and the overall tweezering effect will reveal what looks like black dots in the area. If this happens do not overwork the skin but do leave the hair to grow longer before attempting removal again
- Trim any long brows hairs extending over the top brow hairline and finish the treatment with an SPF application to further protect the skin against harmful UV damage
Hair Removal Method via Facial Wax Strips
- Use a scissors to cut the wax strips into smaller more manageable brow strips
- Apply talc powder to protect the delicate skin area
- Apply the small wax strip focusing on the hair growth outside the natural eyebrow brow line area only (Refer to Tip 1 above) *Work in small sections
- Working against the hair growth, stretch the skin and whip off the wax strip in one swift action
- Do not work over the same area twice!! *The skin in this area is very delicate any remaining hairs can be tweezered out
- Using a brow scissors trim any long brows hairs extending over the top brow hairline
- Finish with the oil-based moisturising pads provided in the pack this also effectively removes any remaining wax residue. *Follow with a protective layer of SPF